Tuesday, March 31, 2009
Falafel
These are an acquired taste for some, but Jack loved Falafel from the first time he tasted while we were living in Connecticut. I later found a recipe for it in one of my Cooking Light magazines and thought I would surprise Jack and make it. It was a hit and I have been making it for over two years. I wouldn't call it a staple, but we certainly enjoy it when we have it. I marvel that all my boys gobble it down, and ask for more. We have served this to friends that were interested in trying something completely new. It is a fun vegetarian dish that is packed with protein.
"The patties will seem small when you're forming them, but they fit perfectly in the pita halves. To prevent the falafel mixture fom sticking to your hands, dip them in water before forming the patties. Look for tahini near the peanut butter and other nut butters. (We have also used sour cream with a drop of sesame oil and lemon juice in it when we can't get the tahini sauce.)
Yield
4 servings (serving size: 2 stuffed pita halves)
Ingredients
FALAFEL:
1/4 cup dry breadcrumbs
1/4 cup chopped cilantro
1 1/2 teaspoons ground cumin
1/2 teaspoon salt
1/4 teaspoon ground red pepper
2 garlic cloves, crushed
1 large egg
1 (15-ounce) can chickpeas (garbanzo beans), drained
1 tablespoon olive oil
SAUCE:
1/2 cup plain low-fat yogurt
2 tablespoons fresh lemon juice
2 tablespoons tahini (sesame-seed paste)
1 garlic clove, minced
REMAINING INGREDIENTS:
4 (6-inch) whole wheat pitas, cut in half
8 curly leaf lettuce leaves
16 (1/4-inch-thick) slices tomato
Preparation
To prepare falafel, place first 8 ingredients in a food processor; process mixture until smooth. Divide mixture into 16 equal portions, and shape each portion into a 1/4-inch-thick patty. Heat the olive oil in a large nonstick skillet over medium-high heat. Add the patties, and cook 5 minutes on each side or until patties are browned.
To prepare sauce, combine yogurt, lemon juice, tahini, and 1 garlic clove, stirring mixture with a whisk. Spread about 1 1/2 tablespoons tahini sauce into each pita half. Fill each pita half with 1 lettuce leaf, 2 tomato slices, and 2 patties."
Ann Taylor Pittman, Cooking Light, NOVEMBER 2003
Monday, March 30, 2009
Baked Penne w/ Chicken and Sun-Dried Tomatoes
My kids loved this dish. Cameron ate three helpings. Jack thought it was to "milky" in flavor (not the most friendly dish for a lactose intolerant person). I thought it was good, but that it could have used a little more sun-dried tomatoes to give it more flavor. Jack and I thought it could have used a few more mushrooms as well.
6 Tablespoons butter, plus more for baking dishes
coarse salt and ground pepper
1 lb penne rigate (I used 17.6 oz Costo Penne)
1 teaspoon olive oil
2 boneless, skinless chicken breast (8 oz each), cut into bite size pieces
1/2 cup plus 2 Tablespoons all-purpose flour (spooned and leveled)
4 garlic cloves, minced (I only used 2 cloves)
6 cups whole milk ( I used 3 cups whole, 3 cups 1%)
10 oz white mushrooms, trimmed and sliced
1/2 cup oil-packed sun-dried tomatoes, drained and thinly sliced
1 1/2 cups (6 oz) shredded provolone (I couldn't find shredded in my little town so I chopped up 8 oz sliced provolone found near the sandwich meats.)
1 cup (4oz) finely grated Parmesan (I only used 2 oz/1/2 cup)
Preheat oven to 400 degrees. Butter two shallow 2-quart baking dishes. In a large pot of boiling salted water, cook pasta 3 minutes short of al dente; drain pasta and return to pot.
In a large nonstick skillet, heat oil over medium-high. Season chicken with salt and pepper; cook until opaque throughout, 3 to 5 minutes oer sde. Halve each piece lengthwise, then thinly slice crosswise.
In a 5-quart Dutch oven or heavy pot melt butter over medium heat. Add flour and garlic; cook whisking, 1 minute. While whisking, gradually add milk; bring to a simmer, whisking frequently. Add mushrooms and tomatoes; cook 1 minute. Off heat, gradually stir in provolone and 1/2 cup Parmesan.
Add chicken and pasta to pot season with salt and pepper. Divide pasta mixture between baking dishes. Sprinkle each with 1/4 cup Parmesan.
Bake , uncovered , until top is golden and bubbling, about 25 minutes. Let stand 5 minutes before serving.
To Freeze prepare through to step 4 , cool. Cover tightly and let foil, and freeze for up to 3 months.
To bake from Frozen to 400 degrees. and bake (still covered in foil) on a rimmed baking sheet until center is hot, about 1 1/2 hours. Remove foil bake until golden, about 15 minutes more.
Sunday, March 29, 2009
Jill's Coconut Curry Chicken
I came up with this recipe after looking at several Coconut Curry Chicken recipes. From the Food Network and a few of the blogs I like to get inspirations from time to time I took multiple recipe ideas and created one that I thought would work for us. This is a kid friendly dish at my household. It passed the test of my niece Jessica (a picky-eater), and the heat is just right for kids in my opinion. Obviously if you can take the heat and want more add more Green Curry Paste! We served this over rice-Jasmine is our personal favorite.
2 Tablespoons oil, divided
1 1/2 lbs Boneless Chicken, cut into bit size pieces
1 medium sweet onion, chopped
1 glove minced garlic (1/2 tsp minced if from a jar)
1/2 Red Bell Pepper, Chopped
5 Carrots, sliced 1/4-inch thick
3 Ribs of celery, thinly sliced
1/2 cup chicken broth
2 cans coconut milk
1 Tablespoon brown sugar
1 Tablespoon flour (For thickener. You could use cornstarch too)
1 Tablespoon Lime juice
1 teaspoon Sea Salt
1 teaspoon Green Curry Paste
Cilantro, chopped
Add 1 Tablespoon oil to pan and saute the onions, and chicken until chicken is no longer pink. Remove chicken from pan and keep warm. Then add remaining oil, bell pepper, garlic, and carrots; stir-fry until crispy tender. Add the curry paste and stir for 1-2 minutes. Pour in broth, cans of coconut milk, lime juice, and salt. Return chicken to the pan and stir until well incorporated. Simmer on a medium-low heat for 10-15 minutes or until desired thickness. Sprinkle fresh cilantro on individual servings when ready to serve.
Saturday, March 28, 2009
Peanut Butter-Finger Mini Cheesecakes
I got this recipe from picky-palate.com. This gals blog is so fun to look at and her food is great. Today I made her mini cheesecakes in preparation for Sunday dinner. We decided to eat them tonight! What a good choice! They were rich, creamy, and enjoyed by all. I have to hand it to her when she said it will do a mini muffin tin that's what it does no more no less. (24 mini cheesecakes). I will admit that her pictures are inspiring so check out her sight. I also have to admit that I have mini cheesecake tin envy. (She bought hers at William Sonoma's for $30. Maybe in time. For now my little pamper chef tin did the job, and if you don't have this great William Sonoma Mini Cheesecake pan yours might come out looking more like mine ;-) ).
Well enjoy the richness of this great little recipe. It will satisfy you in a simple bit or two.
1 Cup ground Vanilla Wafers
2 Tablespoons granulated sugar
2 Tablespoons butter
1/8 teaspoon salt
8 oz softened cream cheese
1/4 Cup creamy peanut butter
1 egg
2 Tablespoons heavy cream
1/8 teaspoon salt
4 Fun Size Butterfinger Candy Bars, crushed
1 Cup semi sweet chocolate chips
2-3 Tablespoons heavy cream
2 Fun Size Butterfinger, crushed
1. Preheat oven to 350 degrees F. Place cookie crumbs, sugar, butter and salt into a bowl; mix to combine. Spoon mixture into bottoms of mini cheese cake pan or mini cupcake pan and press. Bake for 10 minutes and remove from oven.
2. Reduce heat to 300 degrees F. In a stand or electric mixer, beat cream cheese and peanut butter until smooth. Beat in egg, cream and salt until well combined. Slowly stir in crushed peanut butter. Evenly pour batter over baked crust. Bake for 20-22 minutes or until cheesecake is set. Let cool for 2 hours, then remove from pan.
3. Melt chocolate chips in microwave in 30 second intervals until smooth. Stir in cream until smooth and glossy. If needed, return back to microwave for 15 seconds or so until smooth. Spoon over tops of cakes then sprinkle crushed butterfinger over top.
Friday, March 27, 2009
Brown Bag Carmel Corn
This Carmel Corn is so IRRESISTIBLE!!! Diane Paxton gave us a bag of this for Christmas and we fell in love! I finally got around to asking her for her recipe. Growing up my family was known for their Carmel Corn and it was a party regular. So FAM--you are going to love this one. It's not soft and chewy like the family tradition, but has more the texture of Crunch-a-Munch. Tonight was a Friday night slumber party at our house. A single batch of this disappeared quickly amongst the 2 adults and 6 kids. I dare you to try to just eat one handful, near impossible for me!! When something is this yummy why miss out! I hope you enjoy it!! (Thank you Diane!)
1/2 cup Butter or Margarine
1 cup Brown Sugar
1/2 cup white corn syrup
1/2 teaspoon salt
1 teaspoon vanilla
1/2 teaspoon soda
15 cups of popped corn (or more depending on how much carmel you like on your popcorn)
Put butter/margarine in a 2-qt microwave dish; melt. Then add the brown sugar, salt, and corn syrup. Bring to a boil; boil for 1-2 minutes. (Mine boils at 2 minutes, but each microwave is different so watch it and make note the first time). Stir and cook for another 2 minutes. Remove dish from microwave add the soda and vanilla. Drizzle Carmel over popcorn in a large brown paper bag. Stir it or shake it, to coat the popcorn with Carmel. (I personally drizzled it over the popcorn in the large bag, then dumped it into the bag for the shaking step--worked great!) Cook in bag for 1 1/2 minutes. Remove and shake again. Dump out onto a large cookie sheet/ jelly-roll pan to cool. (I used two pans-single layered).
If you would like to make popcorn balls out of this recipe, simply skip the brown paper bag step and form into balls.
Thursday, March 26, 2009
Beef Satay Fried Rice
Quite frequently I like to try new dishes. It seems like they are either Asian or Mexican in flavor when that happens. This dish comes from the latest Pampered Chef Catalog. We enjoyed this dish and I was surprised that my kids ate it so well. They especially loved the peanuts in it. Red bell peppers not so much, but I am proud of them for at least trying my cooking and not complaining. Jack said he liked this dish. It doesn't make our "Wow we need to have this again in the near future!" but is was one we wouldn't mind serving up again when we get the itch for something different.
2 teaspoon (10 mL) vegetable oil, divided
1 lb (450 g) boneless beef top sirloin steak, cut 1/2 in. (1 cm) thick
2 medium carrots, peeled
1 medium red bell pepper
4 green onions with tops
1/2 teaspoon (2 mL) Thai red curry paste (* I used 1/4 teaspoon and it was plenty hot for us-Whimps I know!!)
3 pouches (8.8 oz/250 g each) cooked white rice or 6 cups (1.5 L) cold cooked white rice
3/4 cup (175 mL) peanut sauce
1/2 cup (125 mL) dry roasted peanuts
1 teaspoon (5 mL) salt
1/2 teaspoon (2 mL) coarsely ground black pepper
1. Prepare and cook steak.
Add 1 tsp (5 mL) of the oil to (12-in./30-cm) Skillet; heat over medium-high heat 1-3 minutes or until shimmering. Cut steak crosswise into 1/4-inch-thick (6-mm) strips. Add steak to Skillet, cook and stir 3-4 minutes or until outside surfaces of steak are no longer pink. Remove from Skillet; set aside and keep warm.
2. Prepare vegetables and cook rice and vegetables.
Meanwhile, cut carrots into julienne strips using Julienne Peeler. Thinly slice bell pepper and green onions with Santoku Knife. To same Skillet, add remaining 1 tsp (5 mL) oil and curry paste; cook 1-2 minutes or until fragrant. Separate rice according to package directions. Add rice and vegetables to Skillet; cook and stir 3-4 minutes or until rice is coated with oil and vegetables are tender.
3. Finish and serve.
Add steak, sauce, peanuts, salt and black pepper to Skillet. Cook 1-2 minutes or until heated through, stirring constantly.
Yield: 6 servings
Nutrients per serving: Calories 370, Total Fat 12 g, Saturated Fat 2 g, Cholesterol 25 mg, Carbohydrate 46 g, Protein 21 g, Sodium 540 mg, Fiber 4 g
U.S. Diabetic exchanges per serving: 3 starch, 1 1/2 low-fat meat, 1 fat (3 carb)
Cook’s Tips: Cutting the steak into thin strips before cooking helps it to cook more quickly. Slice it into an even thickness to ensure even cooking.
This recipe is a great way to use leftover rice. Using cold cooked rice will allow the oil to coat the individual grains, preventing them from sticking together.
Peanut sauce is typically made of roasted peanuts, coconut milk and a variety of herbs and spices. It can be found in the Asian section of major grocery stores. Be sure to choose peanut sauce instead of a peanut dip, which tends to be thinner in consistency.
Monday, March 23, 2009
Spinach Salad with Strawberries (Lion House)
This recipe comes form my newest cookbook addition "Lion House Entertaining" I have loved everything I have cooked out of it so far! This was also a recipe that helped me use up a few wontons. I will definitely be making this salad again! It was awesome!
Dressing
2 Tablespoons Red Wine Vinegar
3 Tablespoons sugar
1/2 cup oil
1/2 teaspoon salt
1/2 cup strawberry jam (I used homemade jam)
To make dressing, mix together vinegar. sugar. oil, mustard, salt, and strawberry jam. Mix until all ingredients are well blended. Set aside.
SALAD
1/3 cup sugar
1 cup cashew pieces
15 wontons cut into thin strips
1 large head red leaf lettuce, washed and broken into pieces
1 pkg. Fresh Spinach, with stems trimmed (I prefer Baby Spinach)
1/3 cup bacon pieces, cooked and well drained
1/2 cup red bell pepper, chopped
1 purple onion, sliced ( I like the flavor of onion, but this was an overwhelming amount to me so I used 1/4 cup finely minced)
1 cup strawberries, sliced
Heat a medium frying pan and add sugar and nuts. Stir constanly over medium heat until nuts are coated and slightly browned. Remove from heat and set aside.
Fry wontons in hot cooking oil and drain onto paper towels. ( I tried cutting the wontons in to 4ths and they didn't fry as well as when I divided it by 5 or 6 slices per sheet,)
When ready to serve salad, put lettuce, spinach, bacon, red pepper, onion and strawberries into a large bowl and toss. Add salad dressing and toss. Add sugared nuts and wontons last. Makes 10 servings
I divided up everything in half except the strawberries and I didn't put the dressing on the entire salad. Half a salad was a great side addition to our Sunday dinner when we combine with my in-laws. Half a salad fed 4 adults and small servings to the 5 kids.
Variations: Use fresh raspberries and raspberry jam instead of strawberries and strawberry jam. Substitute almonds for cashews. When fresh berries aren't available, substitute dried cranberries.
This is a personal preference, but ever since I made a spinach salad by Giada De Laurentiis (Food Network chef) I fell in love with the way she cut the spinach into ribbons like this picture shows. I think it makes it so much nicer and easier to eat a salad when the pieces are small.
Sunday, March 22, 2009
Nepolean Cannoli Stacks
Wow! Okay these take a little bit of time to prepare, but not to bad. I got this recipe from www.meals.com (one of my favorites) I was searching for a recipe to help me use up some leftover Won Tons (after making Won Ton soup-simple and good recipe if anyone is interested. I didn't get pictures for the blog, but we'll make it again.) I thought the Raspberry preparation was a little much! I love raspberries so I tried it anyway. I really think you get get by with a seedless raspberry jam or preserve. They also go to all that work to use it to decorate the plates. I personally think it needs to be right in the stack. After decorating it I added a generous amount to the top of the cheese mixture before adding the top. For me it isn't great without the extra raspberry! I also included the nurtitional facts! YEAH I can hear you gasping for air! I did the same thing!!! Dessert is one of those fun treats we must have self-control over and with this one you definetly have to practive moderation!
1 container (15 oz.) ricotta cheese
1 pkg. (3 oz.) cream cheese, at room temperature (I used 5 oz because I like the taste of Cream Cheese more than Ricotta)
1/2 cup sifted powdered sugar
2 cups (12-oz. pkg.) NESTLÉ® TOLL HOUSE® Semi-Sweet Chocolate Mini Morsels, divided
2 cups vegetable oil
16 wonton wrappers
Sifted powdered sugar
2 teaspoons vegetable shortening
2 cups fresh red raspberries
3 tablespoons sifted powdered sugar
COMBINE ricotta cheese, cream cheese and 1/2 cup powdered sugar in medium bowl. Stir in 1 1/4 cups morsels. Cover; refrigerate until ready to serve. (I also added 1 teaspoon of Vanilla)
HEAT oil in deep skillet over medium heat to 350° F. Fry wonton wrappers, 2 or 3 at a time, until golden brown and crisp, about 30 seconds each side. Drain on paper towels. Dust fried wonton wrappers with some of the powdered sugar. Spread wonton wrappers on waxed paper.
PLACE remaining 3/4 cup morsels and shortening in small, heavy-duty plastic bag. Microwave on MEDIUM (70%) power for 20 seconds, knead bag to mix. Microwave at additional 10- second intervals, kneading until smooth. Cut a small hole in corner of bag; squeeze to drizzle over wonton wrappers.
PLACE raspberries in a food processor or blender. Cover; process or blend until smooth. Strain raspberry puree through a fine sieve. Add 3 tablespoons powdered sugar and stir until dissolved.
TO SERVE, spoon 2 tablespoons of the raspberry sauce on each of 8 dessert plates. Top each with a wonton wrapper, chocolate side up. Top each with about 1/3 cup of the ricotta mixture. Top with remaining wonton wrappers.
Calories: 550 Calories from Fat: 290 Total Fat: 32 g
Saturated Fat: 16 g Cholesterol: 35 mg Sodium: 200 mg
Carbohydrates: 63 g Dietary Fiber: 5 g Sugars: 45 g
Protein: 12 g
Saturday, March 21, 2009
Magic in the Middle Cookies
from King Arthur Flour Blog
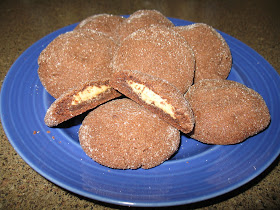
This cookies are one I have wanted this recipe forever. A sister in my ward made these for a baptism we had in our ward. Long story short I never got it from her, but The Sisters Cafe blog (my sister Sherri shared with me) posted it. THANK YOU Sister Cafe! This is copied from their blog (her picture is much nicer than mine--I have got to learn how to photograph food better!) These are SINFUL for me because I can eat more than one or two! They are rich and it is a good thing it only makes about 3 dozen. Pay attention to the note not to over bake! I found storing my extras in a cookie tin or other airtight container is the best way to keep them from going hard quickly.
Chocolate Dough
1 1/2 cups all-purpose flour
1/2 cup unsweetened cocoa powder
1/2 teaspoon baking soda
1/4 teaspoon salt
1/2 cup granulated sugar (plus extra for dredging)
1/2 cup brown sugar
1/2 cup (1 stick) butter, softened
1/4 cup smooth peanut butter
1 teaspoon vanilla extract
1 large egg plus 1 large egg yolk
Peanut butter filling
3/4 cup peanut butter, crunchy or smooth, your choice
3/4 cup confectioners' sugar
1. Preheat the oven to 375°F. To make the dough: In a medium-sized bowl, whisk together the flour, cocoa, baking soda and salt. In another medium-sized mixing bowl, beat together the sugars, butter, and peanut butter until light and fluffy. Add the vanilla and the egg, beating to combine, then stir in the dry ingredients, blending well.
2. To make the filling: In a small bowl, stir together the peanut butter and confectioners sugar until smooth. With floured hands or a teaspoon scoop, roll the filling into 26 one-inch balls.
3. To shape the cookies: Scoop 1 tablespoon of the dough (a lump about the size of a walnut), make an indentation in the center with your finger and place one of the peanut butter balls into the indentation. (I thought it was easiest to just separate the dough into 26 pieces like the filling so I didn't run out or have lots of leftovers.) Bring the cookie dough up and over the filling, pressing the edges together cover the center; roll the cookie in the palms of your hand to smooth it out. Repeat with the remaining dough and filling.
4. Roll each rounded cookie in granulated sugar, and place on the prepared baking sheets, leaving about 2 inches between cookies. Use the bottom of a drinking glassto flatten each cookie to about 1/2-inch thick.
5. Bake the cookies for 7 to 9 minutes, or until they're set and you can smell chocolate. Remove them from the oven, and cool on a rack.
Sunday, March 15, 2009
Basic Pizza Dough-Authentic Neapolitan Dough
I tried this AUTHENTIC NEAPOLITAN PIZZA DOUGH this past week and it was very good. If you like a good rustic and chewy thick pizza crust you might give this one a try. I got this recipe from a Cuisine at Home magazine. I have yet to try a recipe out of it that hasn't gotten rave reviews from my family and extended family (Chicken Piccata's and Japanese style Pork Cutlets). I didn't get a picture of it because it was during time Jack was gone for two weeks to Ecuador and dinners even though I had it planned ahead of time seemed to sneak up on me and the kids.
Makes three 10-14" Pizzas
Total Time 2 hours
Combine:
1 1/2 cups warm water (105-115 degrees)
2 Tablespoons sugar
2 1/4 teaspoon active dry yeast
Mix:
3 1/2 cups all-purpose flour
1/2 cup bread flour
1 Tablespoon Kosher or sea salt
Add to Yeast mixture:
3 Tablespoons Extra-Virgin Olive Oil
Pour yeast/oil mixture into flour and knead.
Combine water, sugar and yeast. Poof until foamy, about 5 minutes.
Mix flours and salt in bowl of heavy-duty stand mixer fitted with dough hook.
Add oil to yeast mixture.
Pour yeast mixture into flour mixture and knead on low speed for 10 minutes (or the same amount of time by hand). Dough will be elastic ad slightly sticky.
Place dough in a lightly oiled bowl (I spray mine with PAM), turn to coat. Cover with plastic wrap and let rise in a warm place until doubled, 1 hour.
Punch dough down and divide into three pieces; shape into balls and place on a floured work surface. Lightly brush dough with oil, cover completely with plastic wrap and let rise another 45 minutes. Meanwhile preheat oven to 550 degrees (mine only goes to 500 degrees) with stone on lowest rack. *Stone should be preheated for at least 30 minutes
Shaping the dough: The dough should remain undisturbed until you're ready to shape it. With that said, take a ball of dough and using your fingers, pat it out from the center to the edge. Leave the edge a bit think so it puffs when baked. Stretch it further , lifting it by the edge and working your way around the circle. For thinner, crisp crust, use a rolling pin to flatten the dough into a larger circle. Once shaped transfer dough to a flour dusted peel (I huge wooden looking spatula- I don't have so I use a flexible cutting board), assemble your pizza, and move to the oven. Bake until edges are golden brown and your cheeses are melted.
Chicken Pot Pie w/ Spring Vegetables (Asparagus and Peas)
This picture was an after thought (because I recently blogged a CHKN Pot Pie). What you see in this picture is all that was left of a 9 x 13 pan shortly after placing it on the table. This recipe was a huge hit with the kids. I served this comfort food classic for Sunday dinner tonight and the kids and adults alike kept coming back for more! One of my nieces doesn't care for celery much so when she found out that I had replaced it with Asparagus she loved it right away. It really hit the spot. The Asparagus was a great find super cheap at Wal-mart. I am usually to frugal to buy it because I think it is to expensive, but not this time!
This recipe comes from my "The New Best Recipe" book (p.351). I think that it gets way to wordy and involved so I have simplified it and posted it as such. You can make the filling and the topping of choice before hand. You just need to warm the filling be for adding your top to it. (I think that it helps cook the bottom layer of the doughs).
1 recipe of the Savory Pie Dough Topping or Fluffy Buttermilk Biscuit Topping (recipes below)
1 1/2 lbs boneless skinless chicken breast and/or thighs (cut into small bite size pieces)
2 cups (1 can) low-sodium chicken broth
1 medium-large onion, chopped finely
3 medium carrots, peeled and sliced 1/4 inch thick (I added 6-8 carrots)
2 small celery ribs (or 18 thin asparagus spears cut into 1-inch pieces replaces it if you go that option)
salt and ground black pepper to taste
4 Tablespoons unsalted butter
1/2 cup unbleached all-purpose flour
1 1/2 cups milk
1/2 teaspoon dried thyme
3 Tablespoons dry sherry (I just used Sherry Cooking wine)
3/4 cup frozen peas, thawed (Increase to 1 cup if using the asparagus)
3 Tablespoons minced fresh parsley leaves (optional- I didn't have any on hand so I left it out)
1. Make the pie dough or biscuit topping and refrigerate until ready to use.
2. In a small amount of oil in a large skillet saute the onions and chicken pieces; cook until chicken is no longer pink. Then add the carrots, asparagus, and peas. cooking until tender about 5 minutes.
3. Meanwhile you can cook the sauce in a separate pan. (This really speeds up the process!) Melt the butter over med-high heat, then add the flour and cook about 1 minute. Whisk in the chicken broth, the milk, and any accumulated juices from your chicken and vegetable pan, sherry, and the thyme. Bring to a boil and simmer until the sauce fully thickens. Season with salt and pepper to taste.
4. Pour the sauce over the chicken mixture and stir to combine. Add the parsley. (The mixture can be covered and refrigerated overnight; reheat before topping with the pastry.) Pour mixture into 9 x 13 baking dish or six small 12-oz ovenproof dishes. Top with desired pastry. Bake until the pastry is golden brown and the filling is bubbling, 30 minutes for larger pies and 20 to 25 minutes for the smaller pies. Serve Hot.
I think you could use any of your favorite pastries here and it would work nicely.
FLUFFY BUTTERMILK BISCUIT TOPPING-enough for 1 recipe of Chicken Pot Pie
1 cup (5 oz) unbleached all-purpose flour
1 cup (4oz) plain cake flour (I used all-purpose here. The book says to use cake flour when you want your pastry to be light and fluffy. I don't even think I can get cake flour in little Lovell, WY)
2 teaspoons Baking Powder
1/4 teaspoon baking soda
1 teaspoon sugar
1/2 teaspoon salt
8 Tablespoons cold unsalted butter, quartered lengthwise and cut crosswise into 1/4-inch pieces
3/4 cup cold buttermilk, plus 1 to 2 Tablespoons if needed.
Pulse the dry ingredients in a food processor fitted with the metal blade. Add the butter pieces and pulse until mixture resembles coarse cornmeal with a few slightly larger butter lumps.
Transfer the mixture to a medium bowl and add the buttermilk. Stir with a fork until dough gathers into moist clumps. (If the clumps are still dry, add more buttermilk, a Tablespoon at a time, up to 2 Tablespoons in all). Transfer the dough to a floured work surface and form in to a rough ball. Roll out the dough until it is 1/2-inch thick. Using a 2 1/2-3-inch pastry cutter, stamp out 8 rounds of dough. IF making individual pies, cut the dough slightly smaller than the circumference of each dish. (Dough rounds can be refrigerated on a lightly floured baking sheet covered with plastic wrap for up to 2 hours.)
Arrange dough rounds over the warm filling and proceed with the recipe for Chicken Pot Pie.
*Okay so I made my biscuits and refrigerated them for a lot longer than two hours and they turned out fine. I did however not rewarmed my filling as suggested and I wish I had done so. The bottoms of my biscuits were a tad bit doughy and I think had the filling been warmer they would have steamed all the way through.
Friday, March 13, 2009
Black Bean and Corn Salsa
I have many a recipe for Black Bean Salsa's. This one taste great and it doesn't have a lot of vinegars or spices so it makes it easier to throw together quickly. I will have to post some of my other well loved Black Bean Salsa's as summer gets closer--seems to be the time we eat it more often with our ripe tomatoes out of the garden.
1 (15 oz) can Black beans, rinsed and drained
1 (11oz) can whole kernel corn, drained
1 teaspoon minced fresh Jalapeno pepper (optional)
1 avocado, chopped
2 medium tomatoes, chopped
1 Red bell pepper, chopped (my mother-in-law added some green bells too and it tasted great)
1/3 cup chopped fresh cilantro (or substitute 1 teaspoon dried)
1/4 cup diced red onion
1/4 cup fresh lime juice (about 2 limes, squeezed)
1 teaspoon salt
Combine all ingredients except avocado and chips. Cover and chill for at least two hours. Add avocado just before serving. Serve with tortilla chips for dipping.
White Chicken Chili's
I got this recipe from my friend Aubrey Walker. She brought it to me one evening when the house was turned upside down while we were putting in the kitchen with some awesome Refrigerator Biscuits (also found on the blog). Every time I have this I think, "Oh this is so good!" Cameron thinks it's spicy hot--so if you have kids you might want to play with the spices to your liking. I am going to post Aubrey's original recipe and then tell you what changes I made in notes following it. Aubrey said this freezes well.
1 lb cooked Chicken cubed (I diced mine into small bite size slightly larger than a bean)
1 1/2 teaspoons garlic powder
1 medium onion chopped
1 Tablespoon Vegetable oil (I used olive oil or Canola oil)
Saute those together until the meat is cooked through. Then add:
2 cans Great Northern Beans, rinsed and drained
16 oz Chicken broth ( I used 24 oz and I think that you could EASILY stretch this recipe for the budget by adding more here)
2 (4 oz) cans chopped green chili's
1 teaspoon salt
1 teaspoon cumin--don't double if you make a double batch
1 teaspoon ground oregano (I used 1/2 teaspoon)
1/2 teaspoon pepper
1/4 teaspoon ceyanne pepper--don't double (I used close to 1/8 tsp.)
Bring to a boil and reduce heat and simmer for 30 minutes. Then add
1 cup sour cream
1/2 cup whipping cream (I forgot to add both of these! Crazy as I had both on hand and that is why I chose the recipe for dinner--duh! But I liked it without it too. It makes the chili more HEART healthy and lower in fat! Can't complain right!!)
After adding the sour cream and cream don't allow to boil again just heat it through. Dish up and enjoy! (If you choose not to add the creams this recipe would freeze well. We also added the sour cream later trying to turn down the heat for Cameron.)
**I think that adding the cream and sour cream tones down the heat, but for us I think 1/8 teaspoon ceyanne pepper is good for starters.
***The picture above is what it looks like without the creamy ingredients.
Last night we had a RS Enrichment night--Theme Use your Beans (food storage night)
This recipe is Betty Hubbell's and was really good. It is different than the first recipe of Aubrey's in taste. It has a nice cheese flavor to it. (It was nice to taste them within a few days of each other. I enjoyed them both.
WHITE CHICKEN CHILI
4 Chicken breast cooked in 1 Tablespoon Olive oil
4 or 5 cups cooked Great Northern Beans
4 cups Chicken broth
2 onions chopped
4 cloves of garlic
2 to 4 cans chopped chilies
2 teaspoons Cumin
1/2-1 teaspoon Cayenne pepper
1 teaspoon Oregano
1 cup chopped fresh Cilantro
Simmer 1-3 hours. Thirty minutes before serving add:
1 cup Half and Half
3 cups shredded Monterey cheese
Do NOT BOIL after adding Half and Half and cheese. Keep warm. She said this Chili freezes well too.
Refrigerator Biscuits
These are the biscuits Aubrey Walker serves with her White Chicken Chili! Delicious!! She got the recipe from Essential Mormon Celebrations by Julie Badger Jensen. Sorry I don't have a picture of this, but it looks like the typical Baking Powder Biscuit.
1 (.25 oz) pkg dry yeast (equivalent to 1 1/2 tsp.)
1/2 cup warm water
5 cups flour
3 Tablespoons sugar
1 Tablespoon Baking Powder
1 teaspoon baking soda
1 teaspoon salt
1 cup butter or shortening (No wonder they are scrumpteous!)
2 cups buttermilk
Dissolve yeast in 1/2 cup warm water. Let stand 10 minutes. In a large bowl, sift together flour, sugar, baking powder, soda, and salt. Cut in the butter with a pastry blender or two knives. In a seperate bowl, combine buttermilk and dissolved yeast mixture; add to dry mixture, stirring only until moistened. Put dough in a large plastic container. Cover and refridgerate for serveral hours before baking. Dough can be stored in refigerator for up to one week. When ready to bake, carefully roll out dough to 1/2" thickness on a well floured surgace. Cut desired shape (When Aubrey brought these to us they were hearts so this is now called "Heart Bread" by Cameron and Quin.). Place biscuits on a greased baking sheet. Bake at 400 degrees for about 15 minutes or until golden brown. Makes 3 dozen biscuits. (Aubrey said that she prefers to cook them all the day she makes them. She doesn't like the way they taste after being refigerated beyond the first day.)
Caramelized Chicken with Cranberry Conserve
This recipe is from Southern Living Christmas Cookbook, p. 114. It was fun for a change and very rich.
Prep: 15 minutes, cook 22 minutes, other 1 hour
3 Tablespoons frozen orange juice concentrate thawed
2 Tablespoons balsamic vinegar
2 Tablespoon dry sherry
1 garlic clove, minced
4 skinned and boned chicken breasts
3 Tablespoons brown sugar
1 Tablesppon dark sesame oil
1 small onion, chopped
1/2 cup dried cranberries
1 to 2 Tablespoons sesame seeds toasted, (optional)
1 to 2 Tablespoons minced green onions, (optional)
Combine first 4 ingredients in a large zip top freeze bad; add chicken. Seal bag and chill at least 1 hour. Remove chicken from marinade, reserve marinade.
Cook sugar and sesame oil in a large nonstick skillet over medium-high heat, stirring constantly, 4 minutes. Add chicken, and cook 3 to 4 minutes on each side. Add reserve marinade, onion, and cranberries; cook, stirring and turning chicken often, 10 minutes or until done. Remove chicken, and let stand 5 minutes. Slice and serve with cranberry mixture. Sprinkle with sesame seeds and green onions, if desired.
Yeilds 4 to 6 servings demending on the size and amount of Chicken you use. I personally think the sauce on this one is so rich you could make a single batch of the sauce and double the chicken. It has been a couple of months since I made this so I am having a brain freeze on anything else I might suggest (I have to do better on blogging them the week I make them. This one was cooked at my sister-in-laws when I didn't have a kitchen. Thanks to Echo for letting us camp in their kitchen and do a combined dinner frequently during our remodel job.)
Saturday, March 7, 2009
Chicken with Mushroom Sauce
My little family enjoyed this recipe. Quin loves mushrooms! He often wants to buy them at the store when he gets to tag along and help me shop, so this was a treat for him. The original recipe calls for Turkey cutlets, but I rarely have turkey on hand so I substituted chicken tenders instead. I have made it with both and it comes out to be a personal preferance of poultry if you ask me.
4 (4 oz) turkey or Chicken cutlets
1/2 cup all-purpose flour
1/2 teaspoon garlic salt
1/2 teaspoon pepper
1/4 cup butter or margarine, divided
1 cup sliced mushrooms
1 (14.5 oz) can chicken broth
Coat cutlets in 1/4 cup flour seasoned with garlic salt and pepper.
Melt 1 Tablespoon butter in a skillet over medium-high heat. Add cutlet. Cook until lightly browned, about 5 minutes per side; drain. Transfer cutlet to serving platter cover and keep warm.
Heat remaining butter in skillet add mushrooms. Saute for 5 minutes. Stir in remaining flour; cook until bubbly, about 4 minutes.
Stir broth into skillet. Cook, stirring continually, until slightly thickened, about 3 minutes. Drizzle sauce over cutlets and serve.
A perfect side dish for this meal is green beans or a toss salad.
Thursday, March 5, 2009
Ramen Noodle Stir-Fry
This recipe came to us by way of the Shambaugh family cookbook-Jack's aunts. This isn't a to die for recipe, but the kids like it because of "Ramen Noodles" and I like it because stir-fries are always quick when you need a meal in a hurry.
1 (3 oz) pkg. Oriental Ramen Noodle mix
2 teaspoons Cornstarch
1 1/2 teaspoons soy sauce (reduced sodium)
1 teaspoon rice vinegar or white wine vinegar
1/4 teaspoon crushed red pepper
1 Tablespoon toasted sesame oil (or another cooking oil you have one hand.)
4 cups Broccoli floweretts or any mix of vegetables (I personally love the the Costco-Kirkland brand stir-fry mix!!)
Chicken Breast or Lean Beef, cut into bite-size pieces (optional)
Break noodles into pieces; reserve seasoning packet. Place noodles in a 1 quart microwave safe casserole dish. Add one cup warm water. Microwave on High for 2 1/2 to 3 minutes or until noodles are softened, stirring twice , drain.
Sauce: in a small bowl combine the seasoning packet, 2/3 cup cold water, corn starch, soy sauce, vinegar and red pepper. Set aside.
In a large skillet or WOK heat oil over med-high heat. Stir-fry vegetables 3-4 minutes or until crispy-tender. Cook, stirring until bubbly, then cook one minute more.
You can also stir-fry chicken breast or lean beef first and then add with the noodles and sauce.
*The picture shows a side of mini egg rolls found in the freezer section of the grocery store.